
In cloud environments, performance is often the top priority, and rightly so. No one wants to be the sole engineer responsible for a critical workload failing due to resource constraints.
To avoid that, many teams lean toward overprovisioning — running more instances than needed, keeping environments active around the clock, and accepting higher costs as a necessary trade-off for reliability and speed.
But here’s the problem: that “just-in-case” approach often extends beyond production. Development environments, Continuous Integration/Continuous Delivery (CI/CD) test setups, staging servers, and sandbox instances are frequently left running long after they’ve served their purpose. These non-production resources consume compute, storage, and memory without delivering continuous business value.
The result? Silent cost leaks that add up over time, especially when scaled across multiple teams, accounts, and regions.
Of course, there are several ways to optimize cloud costs, from rightsizing and re-architecting to using Spot Instances or discount instruments like Reserved Instances, Savings Plans, and committed use discounts. But one of the simplest and most effective tactics is just turning things off when they’re not in use. That’s where automating resource schedules can make a major impact.
In this blog, we’ll walk through how scheduling can reduce waste, what AWS Instance Scheduler is, how it works, and best practices to apply it effectively across your environments.
What Is AWS Instance Scheduler?
AWS Instance Scheduler is a native solution that enables resource scheduling, which is the programmatic start and stop of instances within Amazon EC2, Amazon EC2 Auto Scaling Groups, and Amazon RDS.
Resource scheduling helps teams reduce costs by ensuring resources only run when needed. The tool allows users to define custom schedules in a DynamoDB configuration table and leverages AWS Lambda to execute all start/stop actions. This makes it particularly useful for managing non-production environments like development, staging, or QA that don’t require 24/7 uptime.
But remember, scheduling isn’t necessarily restricted to just non-production environments. It can also be leveraged for “inactive hours” like weekends, off seasons and nights for production environments that don’t need to run around the clock.
It’s important to understand how these actions work. Starting an instance powers it on from a stopped state, whereas launching refers to provisioning a brand-new instance. Similarly, stopping halts the instance but retains its configuration and associated resources like volumes, while terminating permanently deletes the instance and its data.
AWS Instance Scheduler just uses start and stop actions, so it preserves your environments while avoiding unnecessary runtime costs. Careful tagging and schedule configuration are key to ensuring the right resources are affected at the right time.
Benefits of AWS Instance Scheduler
Instance Scheduler makes it easy for businesses to enforce smarter cloud spending habits while streamlining their resource management. This provides multiple benefits, including:
- Lower cloud costs: Instance Scheduler helps enforce predefined stop/start times for inactive resources. While it doesn’t determine when resources should run, it reliably executes the schedules defined by application or workload owners, leading to consistent runtime control and meaningful cost savings over time.
- Improved operational efficiency: Instead of relying on engineers to write and maintain custom scripts to manage instance schedules, AWS Instance Scheduler provides a ready-to-use, scalable solution that automates start and stop actions based on defined time windows. This removes the need for manual scheduling logic or ongoing script maintenance, freeing up engineering time to focus on more strategic and value-driven work.
- Flexible instance scheduling: Instance Scheduler makes it easier for businesses operating with distributed teams to automate start/stop schedules based on their own unique needs and core hours.
- Enhanced governance: By helping to standardize start/stop procedures for different resources, Instance Scheduler introduces better consistency and cost control into cloud environments. This helps to create more financial accountability across cloud management teams and supports improved governance protocols.
- Integration with AWS Systems Manager: Instance Scheduler can integrate with SSM’s maintenance windows, to stop and start resources in accordance with predefined maintenance windows.
How Does AWS Instance Scheduler Work?
AWS Instance Scheduler has a range of features and integrations designed to simplify scheduling. Below are the different requirements and steps to make it work:
1. Set up deployment prerequisites
Before deploying the scheduler, make sure your AWS account has the necessary permissions. These include the ability to create IAM roles, manage Lambda functions, configure CloudWatch rules, and provision DynamoDB tables.
The solution is deployed using a prebuilt CloudFormation template provided by AWS, which guides you through key setup parameters such as tag key definition, target services, time zones, and scheduling frequency.
2. Understand how the system operates
Once deployed, an EventBridge rule triggers a Lambda function at regular intervals — five minutes by default. This function checks all tagged EC2 and RDS instances in the account, compares their current state with the schedule defined in DynamoDB, and starts or stops them accordingly.
The scheduler supports multiple regions, accounts, and services, and can scale across environments without manual intervention.
3. Define schedules
Schedules are created by combining one or more time periods, which specify start times, end times, and weekdays. Each schedule is assigned a name and a time zone. To apply a schedule to an instance, you simply tag it.
For example, Schedule = office-hours. This tag connects the instance to the corresponding schedule configuration, which resides in the DynamoDB configuration table.
The act of tagging is how the scheduler knows which resources have opted-in to the scheduling solution. Whether done manually, via CLI, or through infrastructure-as-code (IaC) pipelines, consistent and accurate tagging is critical for success.
4. Start and stop actions are automated by tags
On each run, the scheduler’s Lambda function reads the tags on each instance and checks whether the instance should be running based on its associated schedule. If not, it stops it. If the instance should be running and is currently stopped, it starts it. These actions happen automatically and consistently across all environments where the tag configuration is applied.
5. Monitor and audit using CloudWatch Logs
Every action taken by the scheduler is logged in Amazon CloudWatch Logs. This allows you to track when instances are started or stopped and to troubleshoot any unexpected behavior.
You can also enable optional metrics to track things like the number of running scheduled instances, skipped actions, or tag mismatches. These insights are useful for validation, performance tracking, and debugging. The solution offers an optional pre-configured Amazon Cloudwatch dashboard you may choose to deploy.
When Should You Use AWS Instance Scheduler?
AWS Instance Scheduler is ideal for workloads with predictable usage patterns, where instances don’t need to run 24/7. The most common use case is automating the start and stop of EC2 and RDS instances in non-production environments like development, testing, and staging.
Since these environments are typically active only during business hours, scheduling them to stop during nights, weekends, or holidays can lead to significant cost savings without manual intervention.
Best Practices for AWS Instance Scheduler
To get the most value from AWS Instance Scheduler, apply the following best practices:
Use standardized tagging conventions
Tagging is the foundation of AWS Instance Scheduler. If your tags aren’t consistent, your schedules won’t work as intended. This is because the scheduler relies on specific tag values, typically descriptive names like “US-working-hours” or “weekdays-9-5,” to identify which instances to start or stop.
To accelerate adoption and maximize savings, establish a consistent and predictable naming convention for your schedules that includes timezone information and explicit start/stop hours. Enforce these standards across your environment to minimize confusion and prevent errors.
For example, inconsistent naming such as “US working hours” vs “IST_9_to_5” vs “UK WEEKENDS OFF” could create confusion among developers and engineers as they try to opt-in to the scheduling solution.
While the tag key is typically consistent (such as “schedule” or “stop” or “start”), it’s the tag values that require strict standardization. These values define the schedule names stored in DynamoDB, so inconsistencies in case, spacing, or delimiters can cause the scheduler to fail or behave unpredictably.
Prevent issues by documenting acceptable formats and ensuring all teams use the same conventions across all tagged resources.
Test schedules on non-critical instances first
While AWS Instance Scheduler is often used for non-production environments, that’s not always the case. Schedules can apply to any inactive resources, whether in dev, test, staging, or even lightly used production environments. That’s why it’s essential to test any new schedule on non-critical instances first.
Start by applying the schedule to a small set of test instances, then monitor the behavior through CloudWatch Logs to confirm that start/stop routines trigger as expected. This helps catch misconfigurations related to time zones, frequency, or scheduling windows before rolling changes out to a broader set of EC2 or RDS instances.
Enable notifications for failed schedule actions
Proactively monitor all your scheduled instances by configuring failed action alerts. Using CloudWatch, filter your scheduler logs and search for any instances that have errors associated with them. Or you could deploy the optional custom cloudwatch dashboard to highlight issues without the need for manual log querying
You can then create a custom CloudWatch alarm that will notify you whenever other activities have that same status. This helps you to quickly address unexpected errors and avoid cost overruns.
Document schedule ownership and maintenance procedures
Assign clear ownership over any automated schedules created through the Instance Scheduler. This helps to designate accountability over updating company documentation with new key tags and schedule definitions.
Taking this extra step makes it easier to keep all instance schedules updated as business needs change or when team members take on different roles.
Centralized vs. decentralized schedule reviews
Scheduling reviews can be handled by a central team or delegated to individual engineering teams. While centralized control brings consistency, it often slows down changes. Teams must route updates through another layer, which makes it harder to catch mistakes or respond to shifting needs.
Decentralized reviews usually work better. Engineers know their workloads best and can adjust schedules based on real usage patterns. This leads to more accurate automation and faster decision-making.
To keep schedules aligned with business needs, empower teams to manage their own schedules, review them regularly, and modify them as needed.
Monitor logs for misfires or permission issues
Make it a point to consistently evaluate your CloudWatch Logs to look for potential scheduling errors that can impact your cloud spending. Keep an eye out for typos with your schedule tags or missing IAM permissions and address them as needed.
By being proactive with your Instance Scheduler logs, you can detect issues as soon as they appear and prevent them from becoming larger operational problems.
Combine with cost reporting tools to validate savings
Leverage cloud native tools like AWS Cost Explorer to validate the savings that the Instance Scheduler provides your business long-term.
By combining Cost Explorer with real-time Cost and Usage Report (CUR) data, you effectively benchmark your monthly spend before and after applying automated instance schedules. This can help you determine how effectively your optimization strategies are working, or if they require improvement.
Use Compute Optimizer for a central team
In a decentralized scheduling model where engineering teams control their own instance schedules, a centralized FinOps or cloud operations team can still maintain visibility using AWS Compute Optimizer. Even without deep workload or application context, Compute Optimizer helps identify periods of consistent underutilization, especially for non-production resources.
The central team can use these insights to suggest or implement schedules that align with historic idle times. This enables engineering teams to move fast while giving the central team the data needed to guide savings efforts, validate impact, and ensure cost efficiency across the organization.
Looking Beyond Native Scheduling: ProsperOps Scheduler in Action
While AWS Instance Scheduler helps automate instance start and stop actions, it works independently from broader cost optimization strategies. Because it’s not integrated with rate optimization tools, changes in schedules won’t automatically adjust commitment coverage. Additionally, schedules are centrally defined in a DynamoDB table, and visibility into outcomes typically requires reviewing logs and manual tracking to assess the impact of scheduling decisions.
ProsperOps Scheduler is built to close these gaps. Integrated seamlessly with our Autonomous Discount Management (ADM) platform, it brings usage and rate optimization together in a single automated system. It distributes schedule control to those closest to the workloads i.e. engineers, and centralizes visibility of the schedules themselves and the savings they realize for FinOps.
Here’s how ProsperOps Scheduler extends the scheduling experience:
Scheduling that synchronizes with discount automation
ProsperOps Scheduler integrates seamlessly with ADM. When resource usage patterns change, such as non-production environments being powered off outside business hours, the scheduler informs ADM’s algorithms in advance. This alignment allows commitment coverage to adjust based on projected usage, not in reaction to engineering changes.
Use tags to define schedules and let ProsperOps handle the rest
Engineers create schedules using native cloud tags. They don’t need access to the ProsperOps Console, nor do they need to work with the team centrally managing a DynamoDB table — as is the case with the native AWS Scheduler. As long as they can apply tags to resources, they can define schedules using their existing tools or workflows. ProsperOps continuously reads these tags and executes the defined state changes across EC2 and RDS resources without requiring manual intervention.
Decentralized control with full visibility
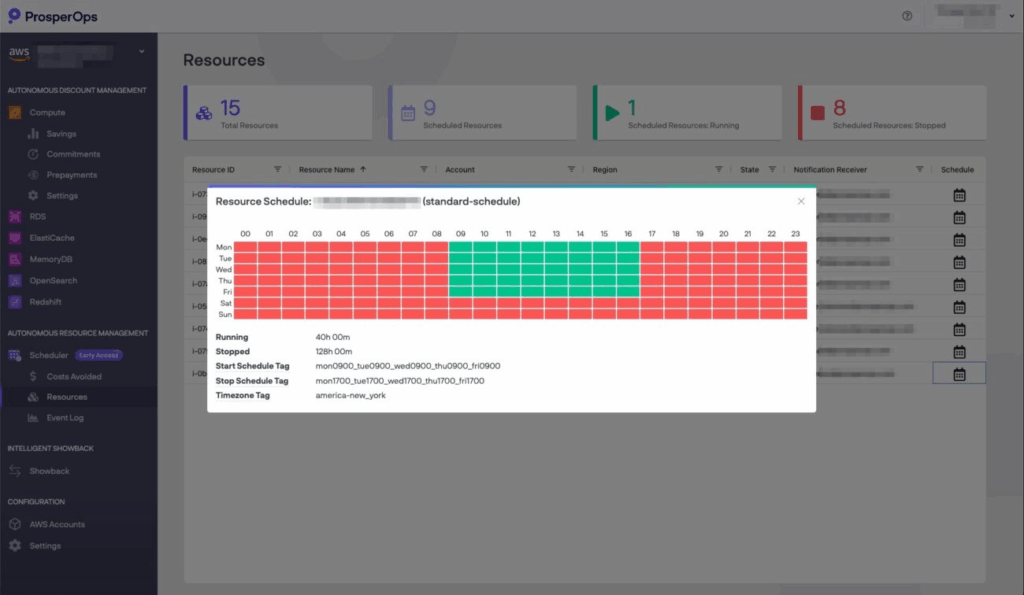
Engineers manage their own schedules, while the FinOps team can track everything through the ProsperOps Console. This includes:
- Resources View to see all scheduled resources, their current states, next transitions, and ownership
- Event Log to view all state changes in order, filtered by resource, account, or region
- Costs Avoided Dashboard to measure the actual costs avoided through scheduling, including resource hours saved and on-demand spend avoided
Solving the disconnect between usage and rate optimization
Usually, workload optimization and commitment management are handled separately i.e., siloed. One team may reduce usage while another commits to long-term discounts, leading to unused reservations or missed savings. ProsperOps Scheduler eliminates this disconnect. It allows both efforts to stay in sync by sharing scheduling data directly with ADM, so commitment decisions are always informed by actual and projected usage.
If your team is ready to align usage automation with commitment optimization and move toward a more integrated approach to cloud cost management, ProsperOps Scheduler is a step in the right direction.
ProsperOps Scheduler is available in Early Access for AWS ADM customers. For more details, visit our Help Center or schedule your free demo today!